Thermostat becomes a roller shutter UI

Open source software and hardware is often hard. Contrary to proprietary and closed solutions like Apple’s, open / free alternatives are often not polished. They usually take you lots of work to make them usable.

However, they give you all the power. You can do anything you want with them… Like turning a thermostat into a roller shutter user interface.

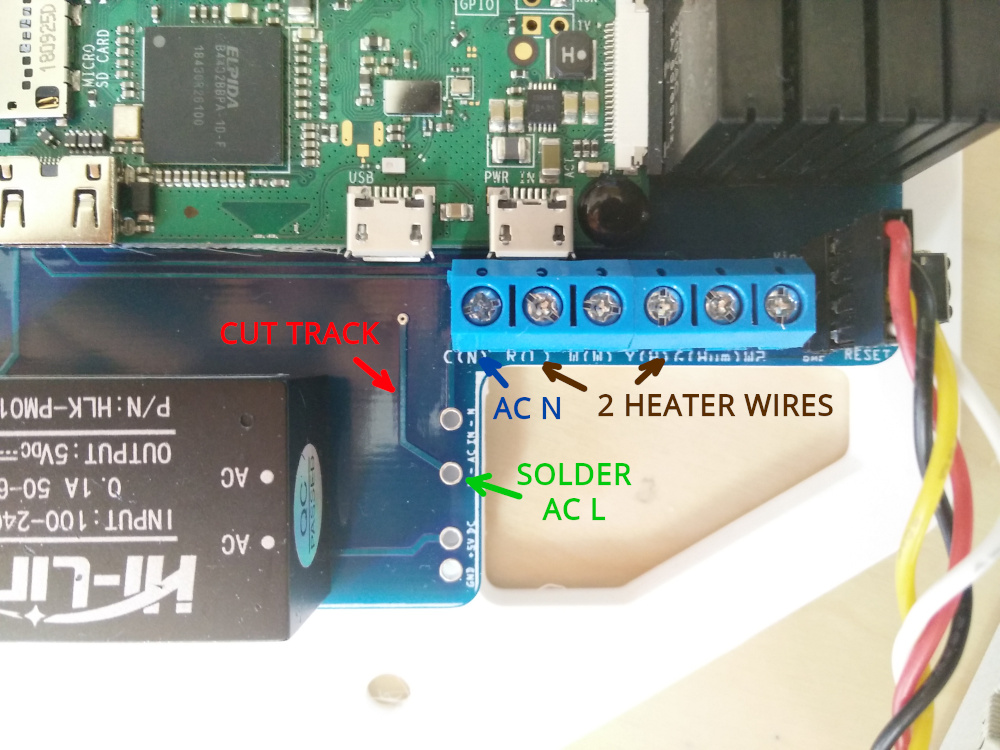
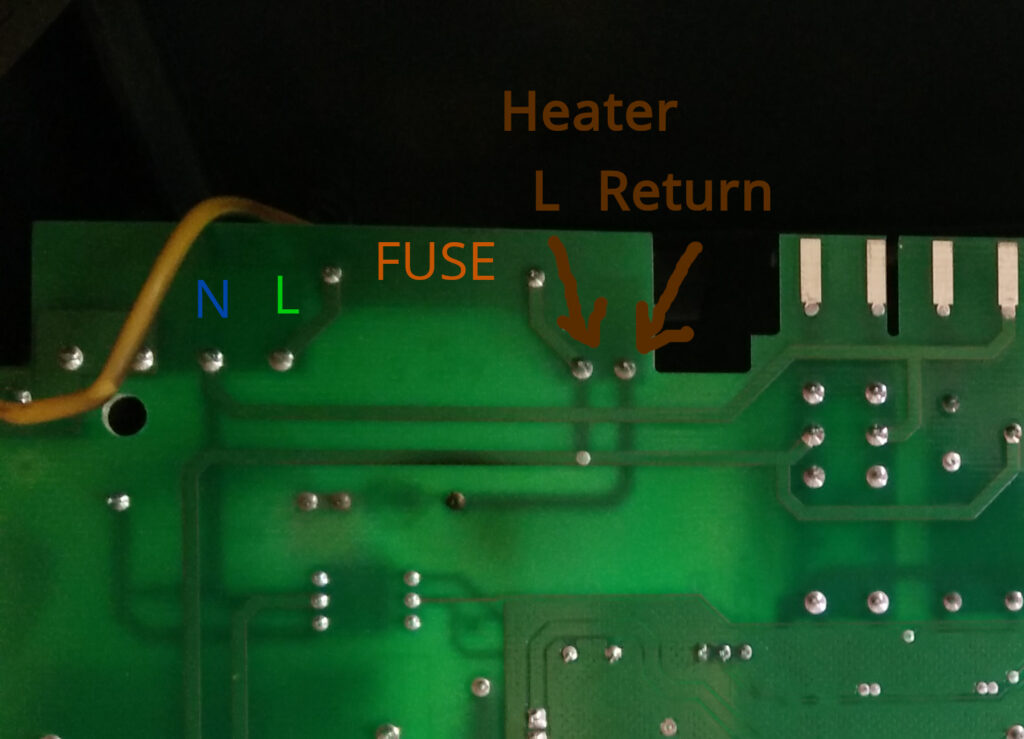
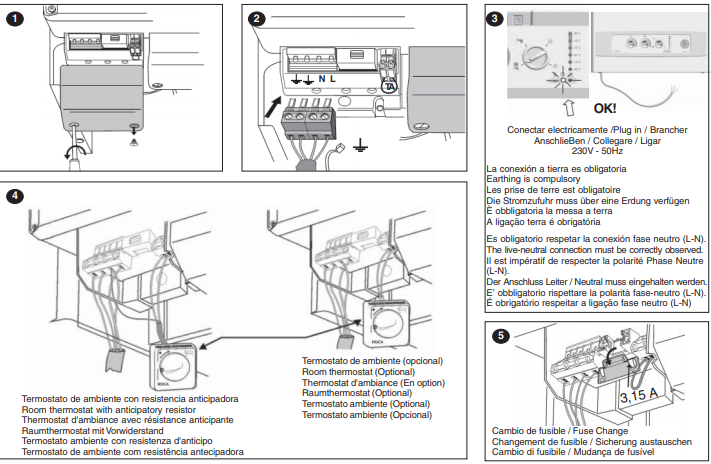
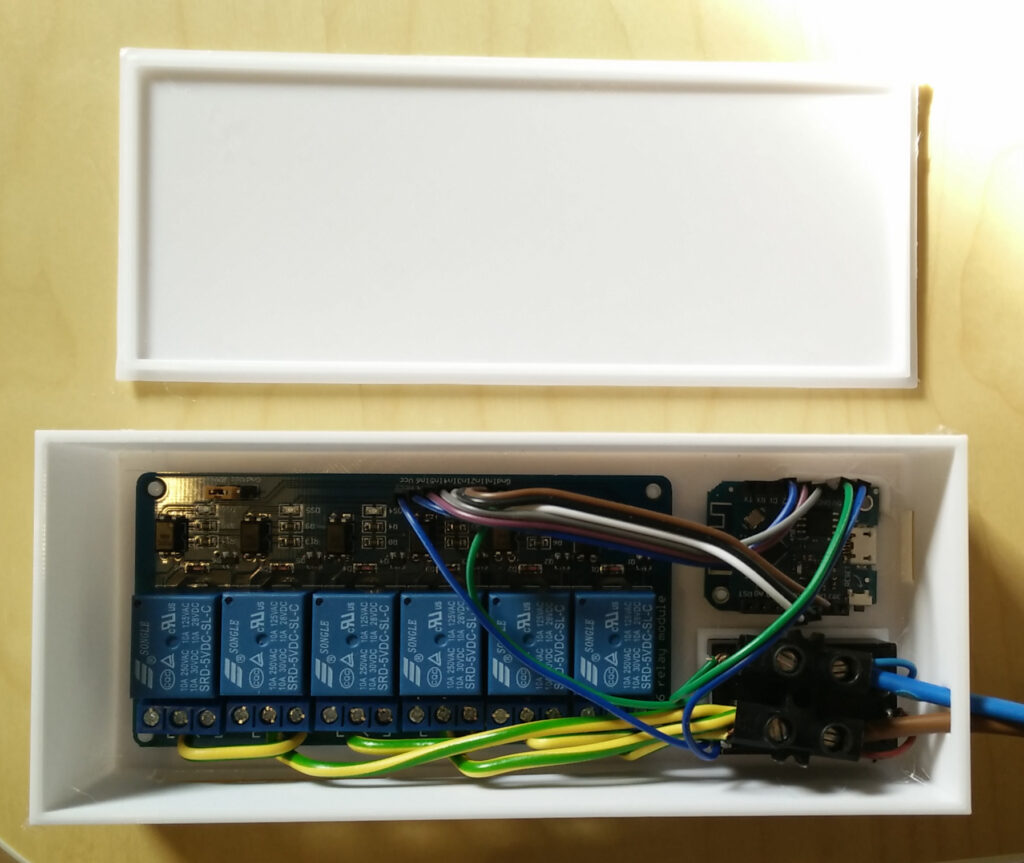
When I was thinking about automating my roller shutters, I didn’t know how to start. Luckily, I found a post from Recretonica where it was explained how to build a DIY roller shutter controller from scratch. I reproduced it easily with a Wemos D1 mini, a 6 channel relay and a HLK-PM01 AC to 5V transformer. No more electronics were needed.

Electronics: Wemos D1 Mini, 6 channel relay and HLK-PM01

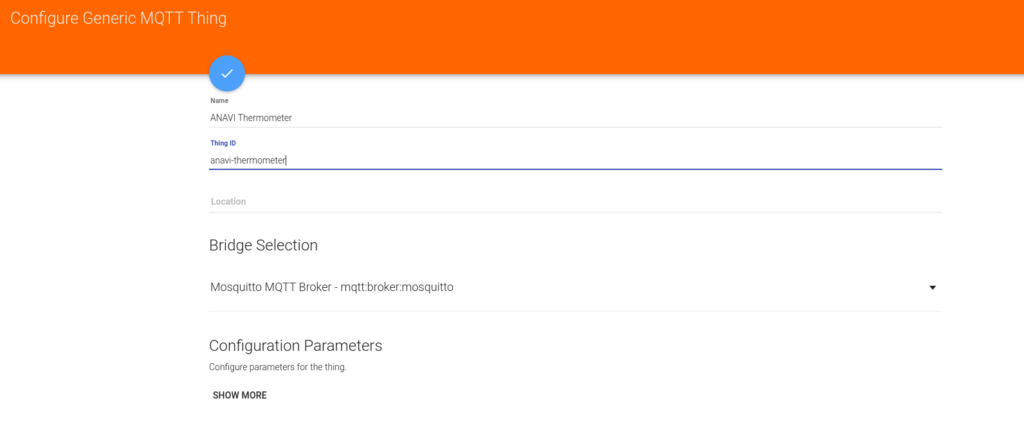
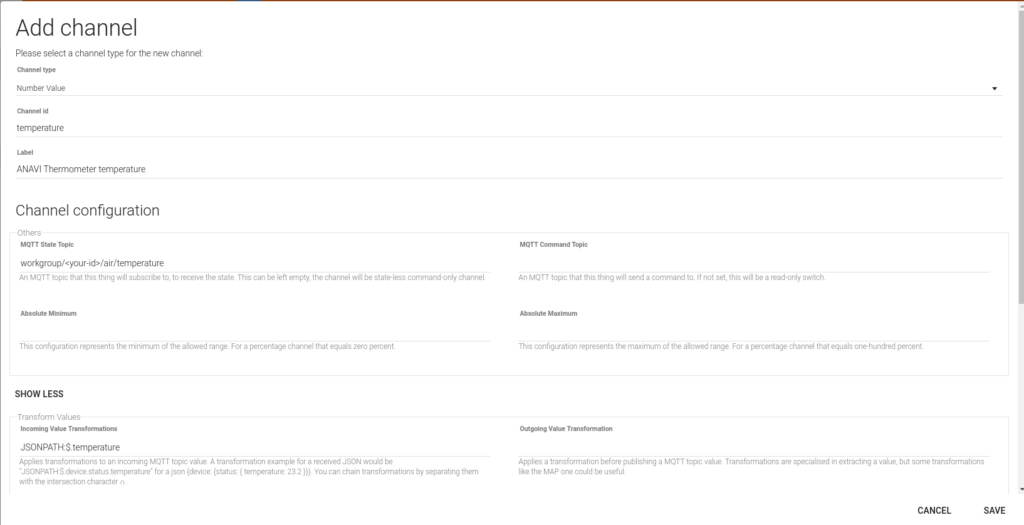
An Arduino sketch controls the roller shutters position using MQTT. It subscribes to the corresponding MQTT topics, and commands the relay for the seconds that the roller shutter expends to move to the new position. You can find the sketch in my roller shutter repository.

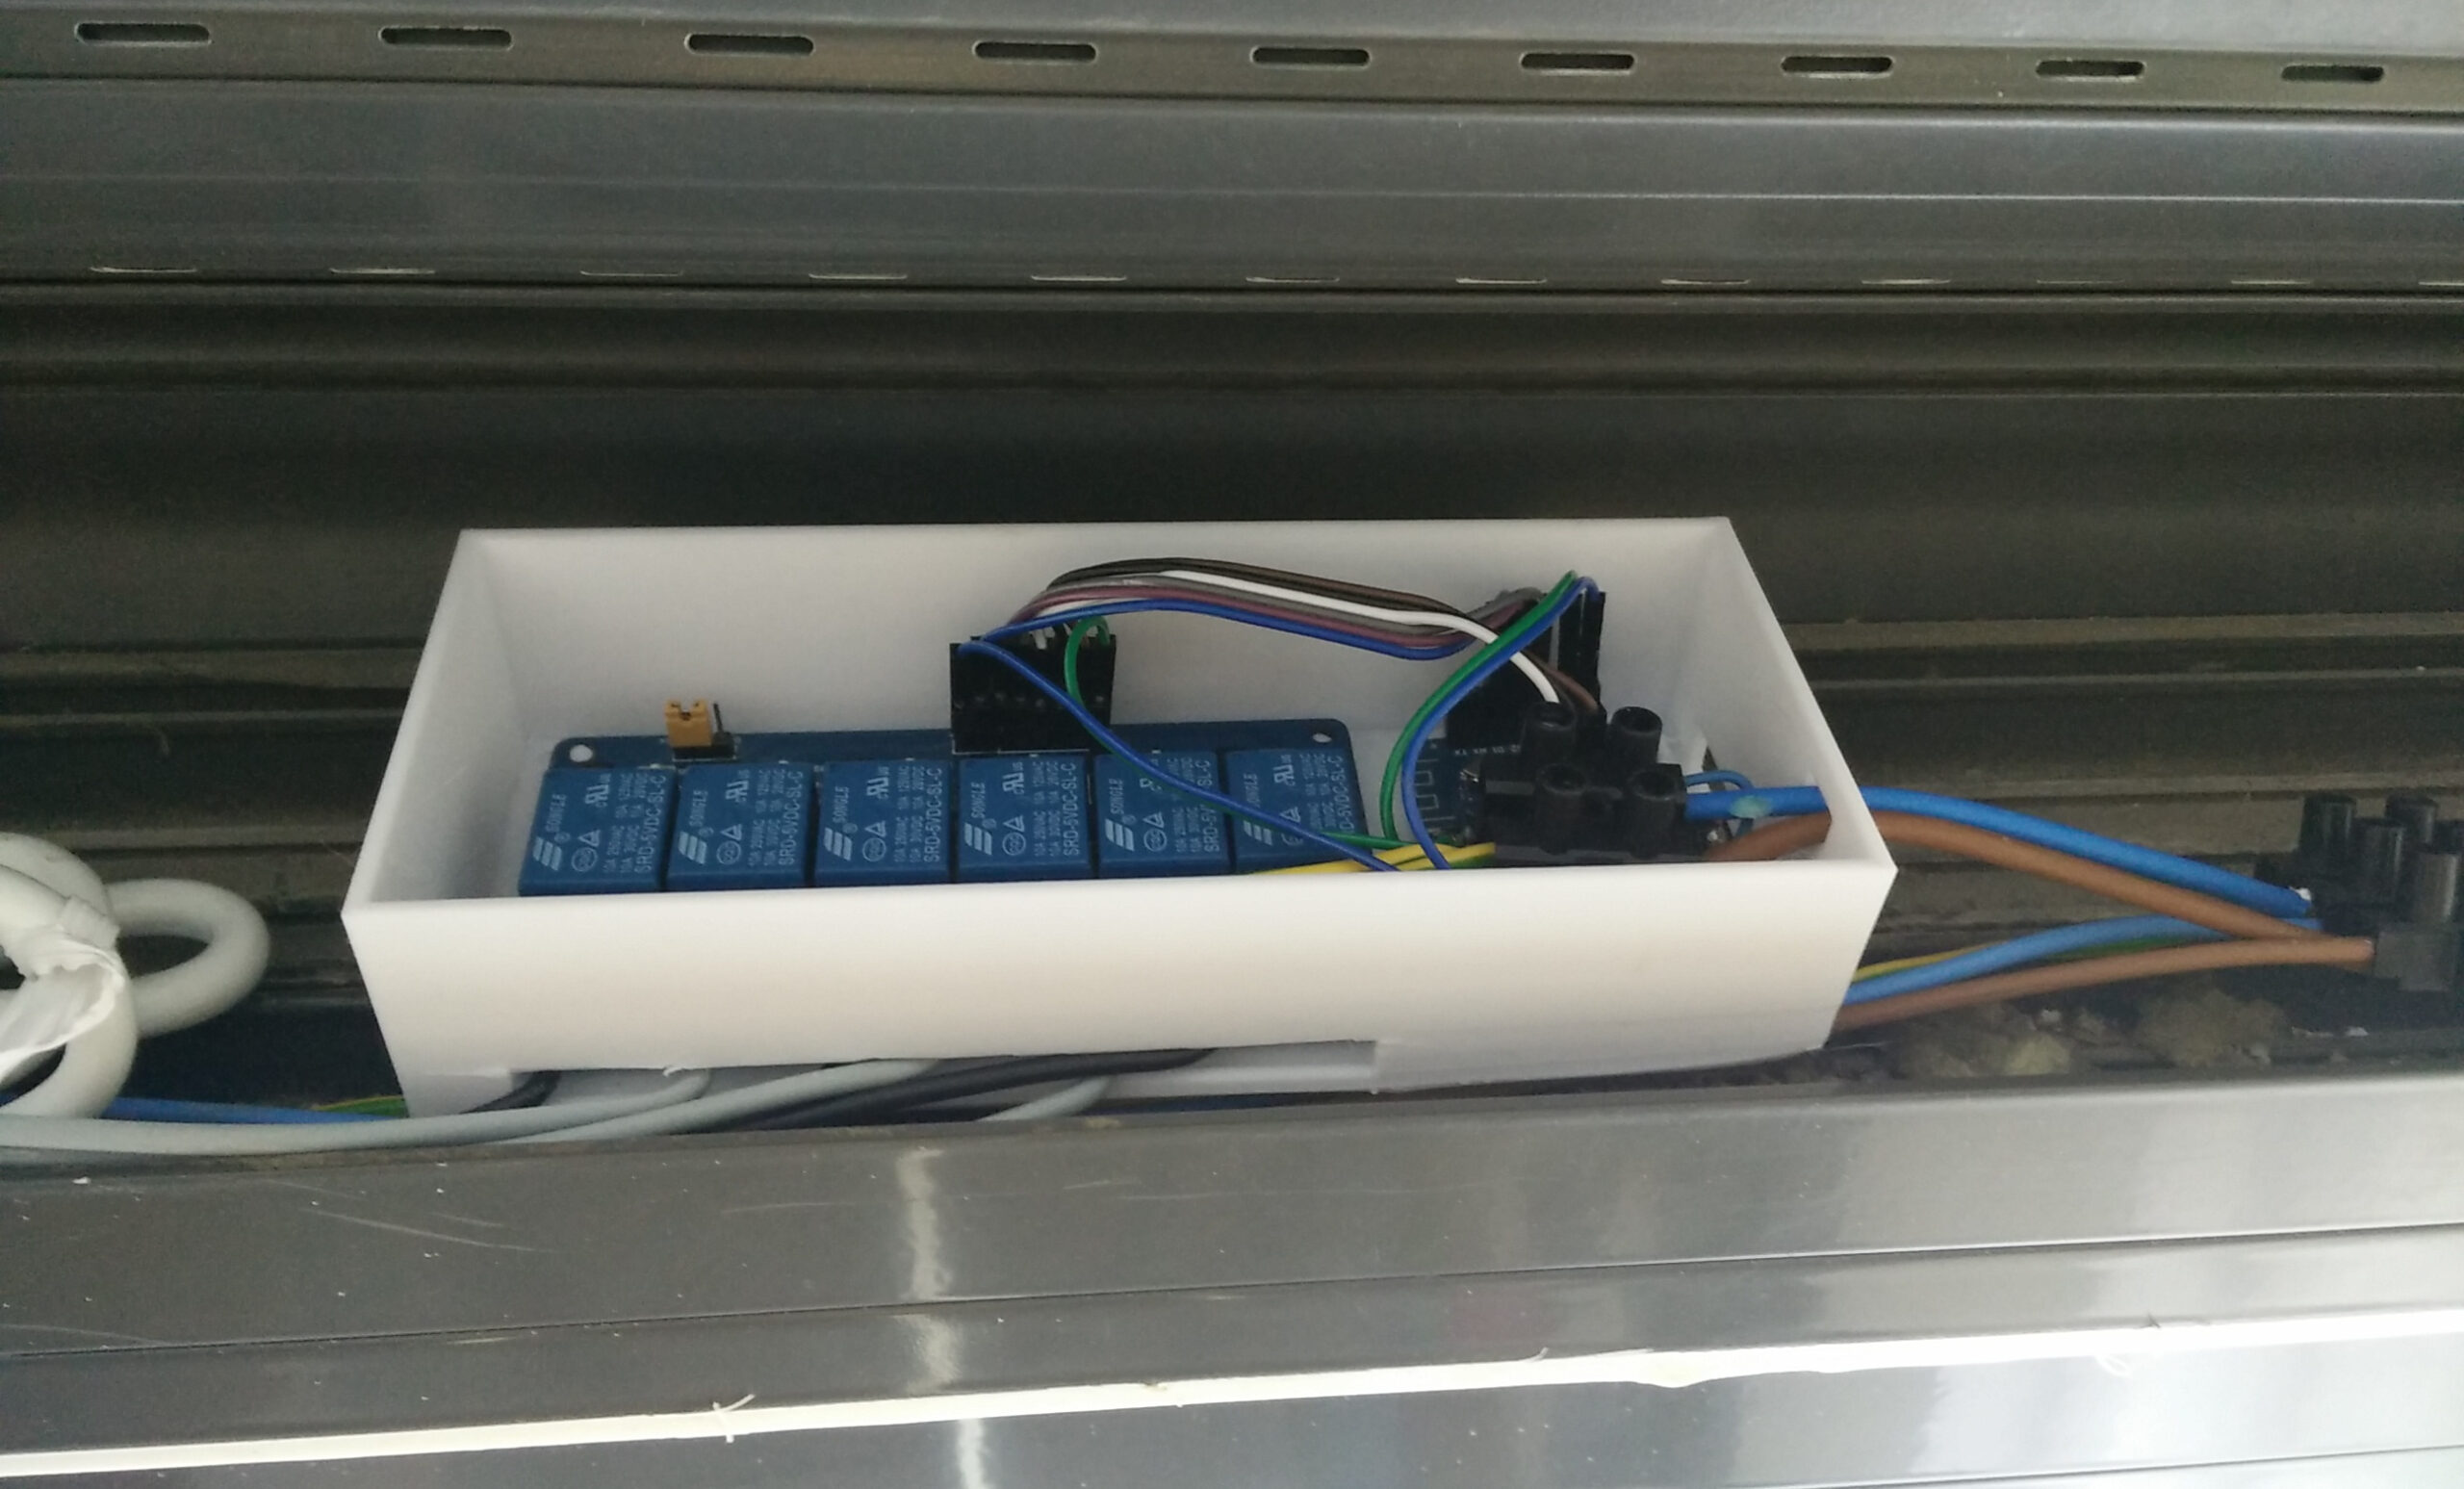
I also designed a 3D printed case for the electronics, so they got isolated inside the roller shutter box, away from any humidity bough by the shutter.

Roller shutter controller case box

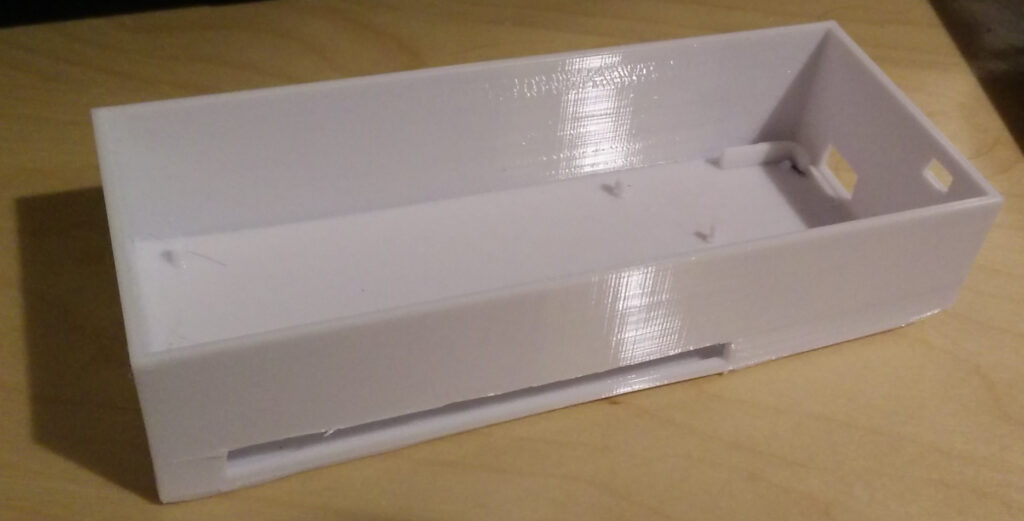
This was my first 3D design, so it was not easy. I was happy to start learning Blender. But the reality is that there is some distance from what you design, how it gets printed, and how it works. I had to make some tests and prototypes, and still, I had to cut back and adapt the final print. You can find the 3D case in my Thingiverse account.

Case box with electronics and top

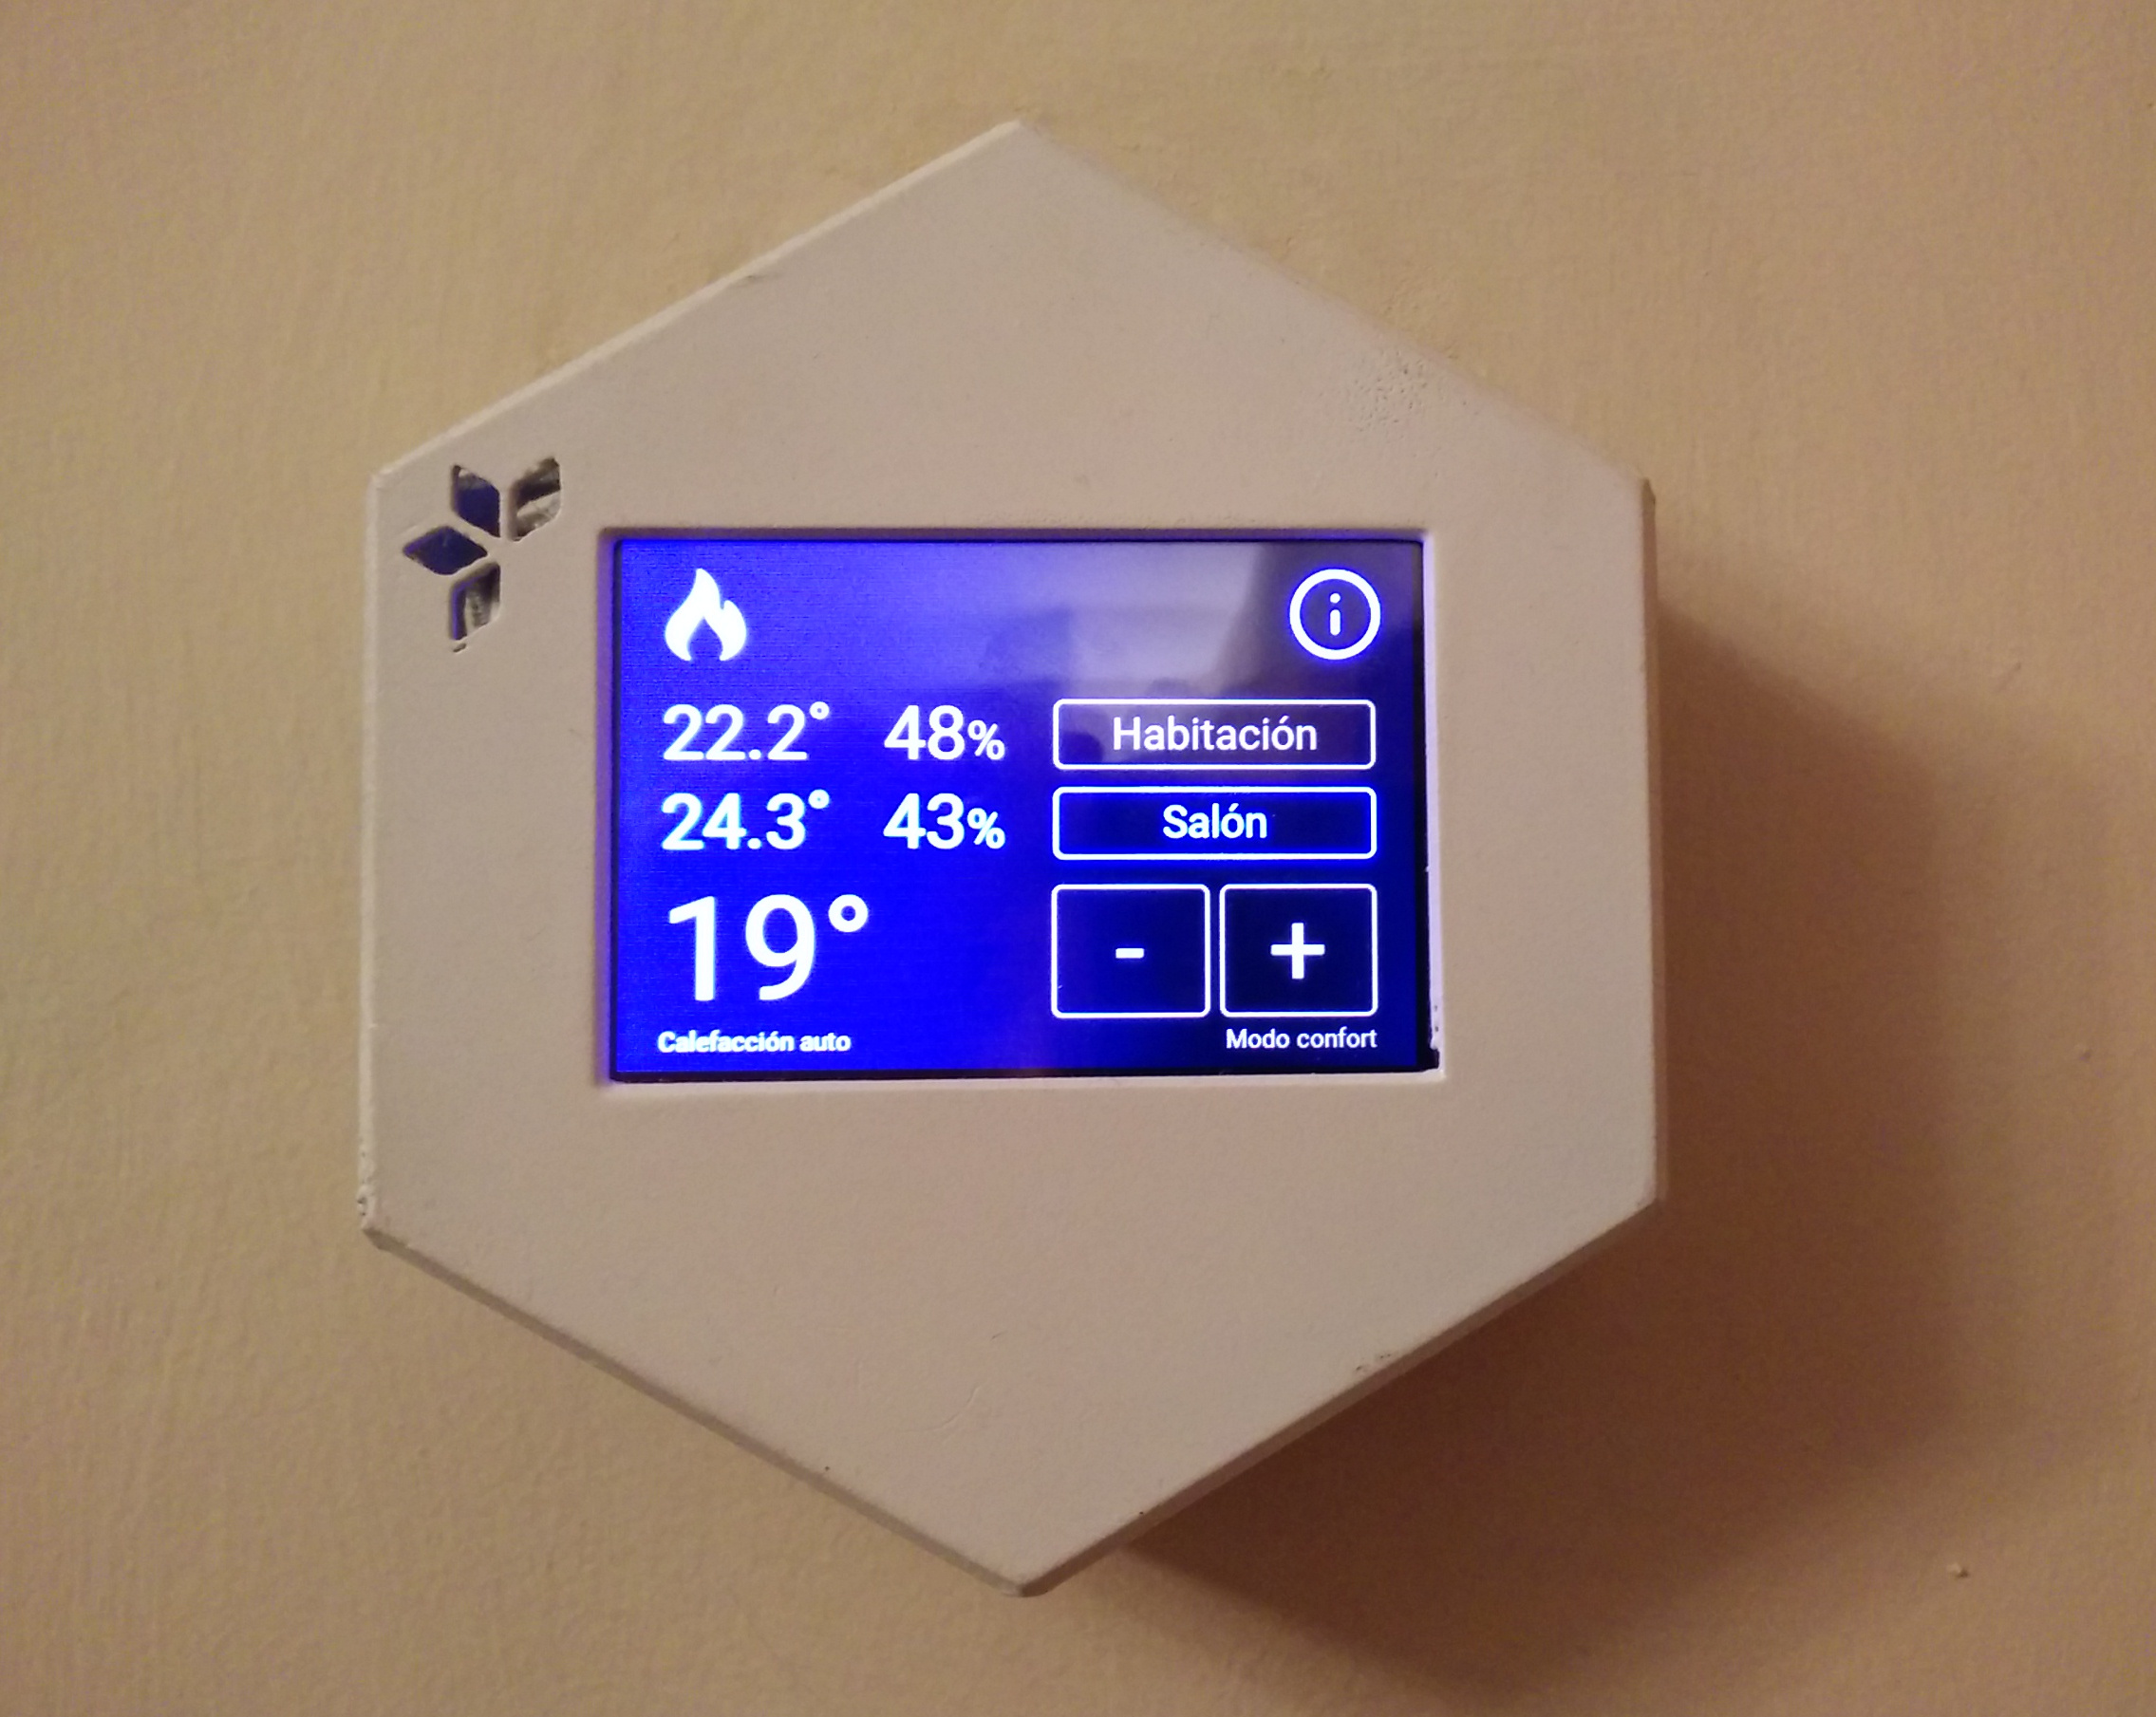
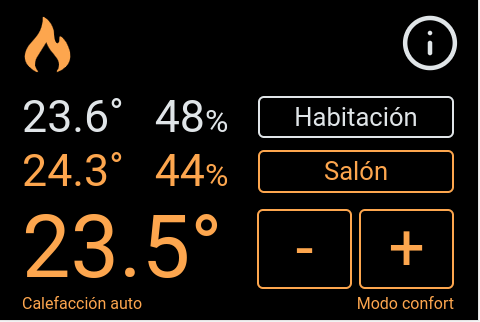
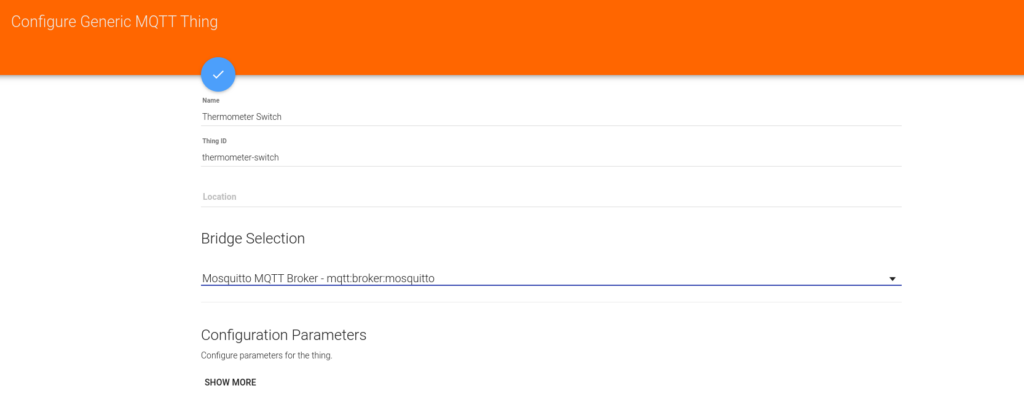
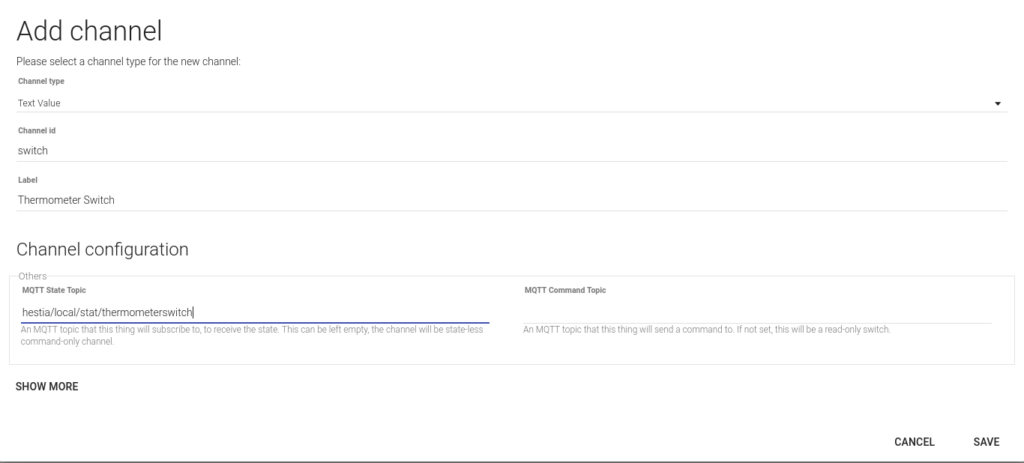
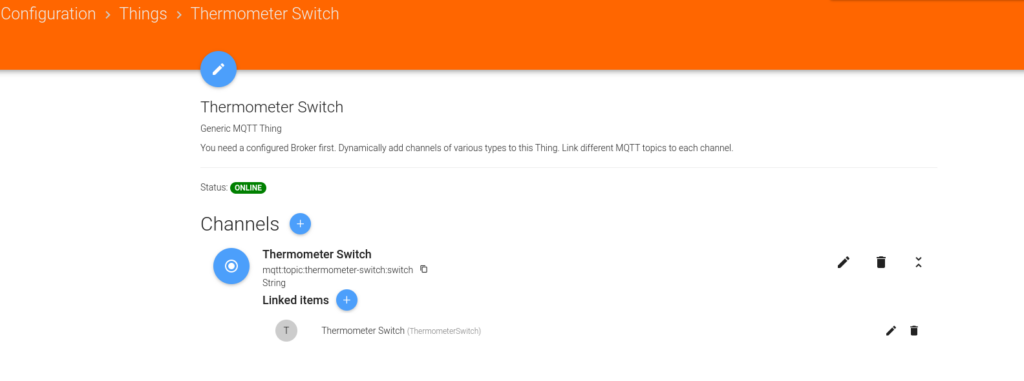
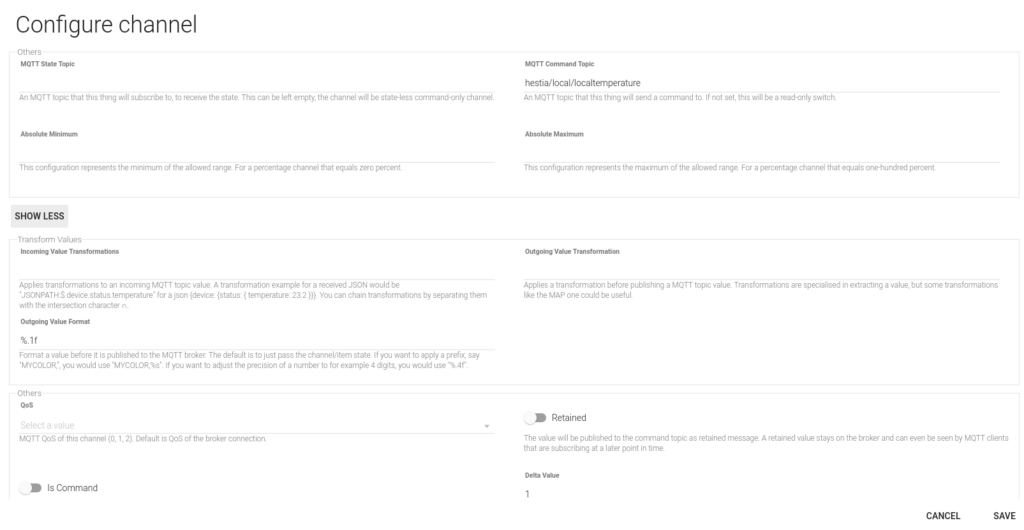
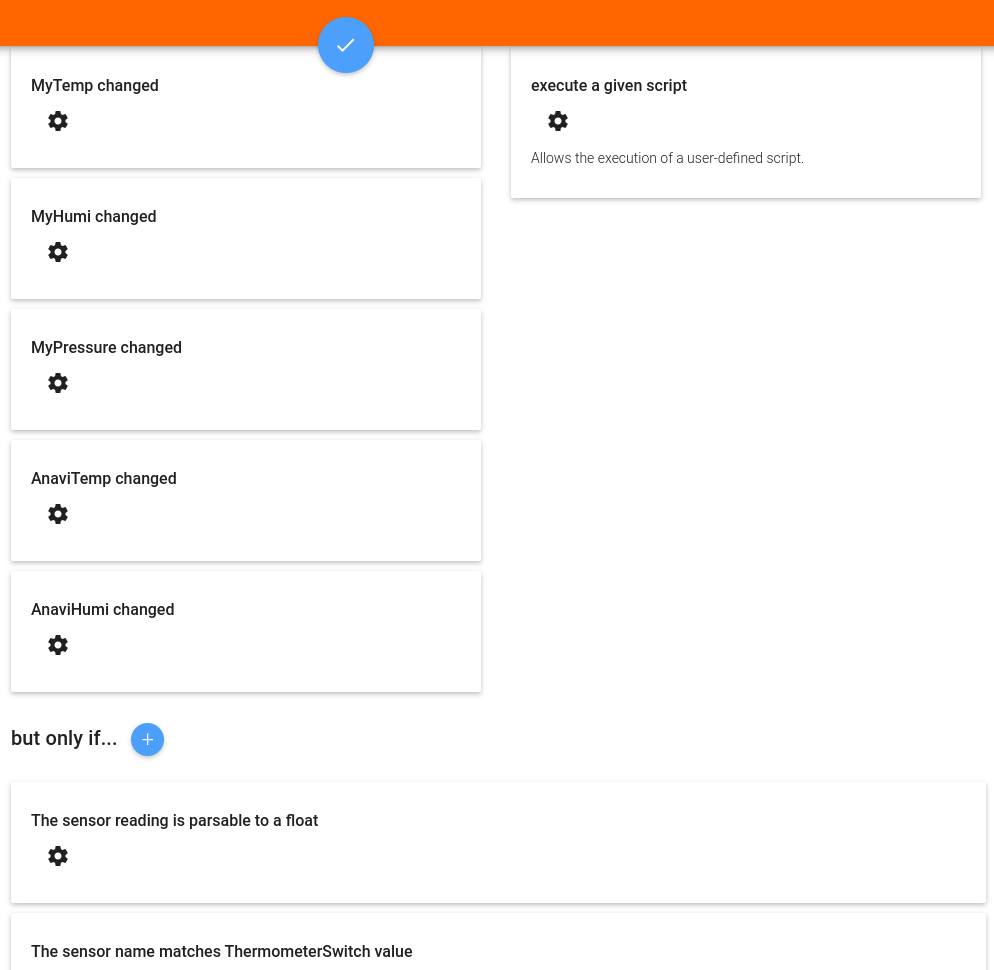
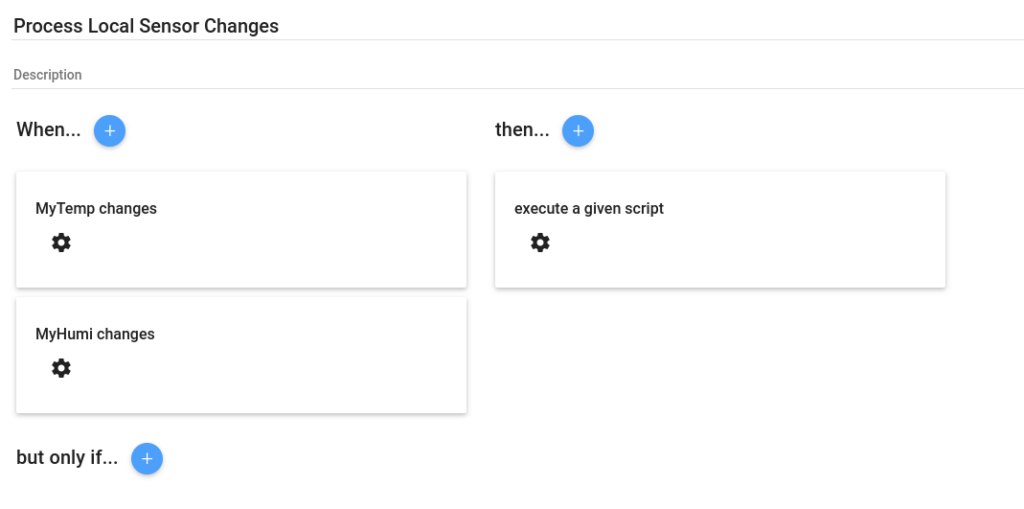
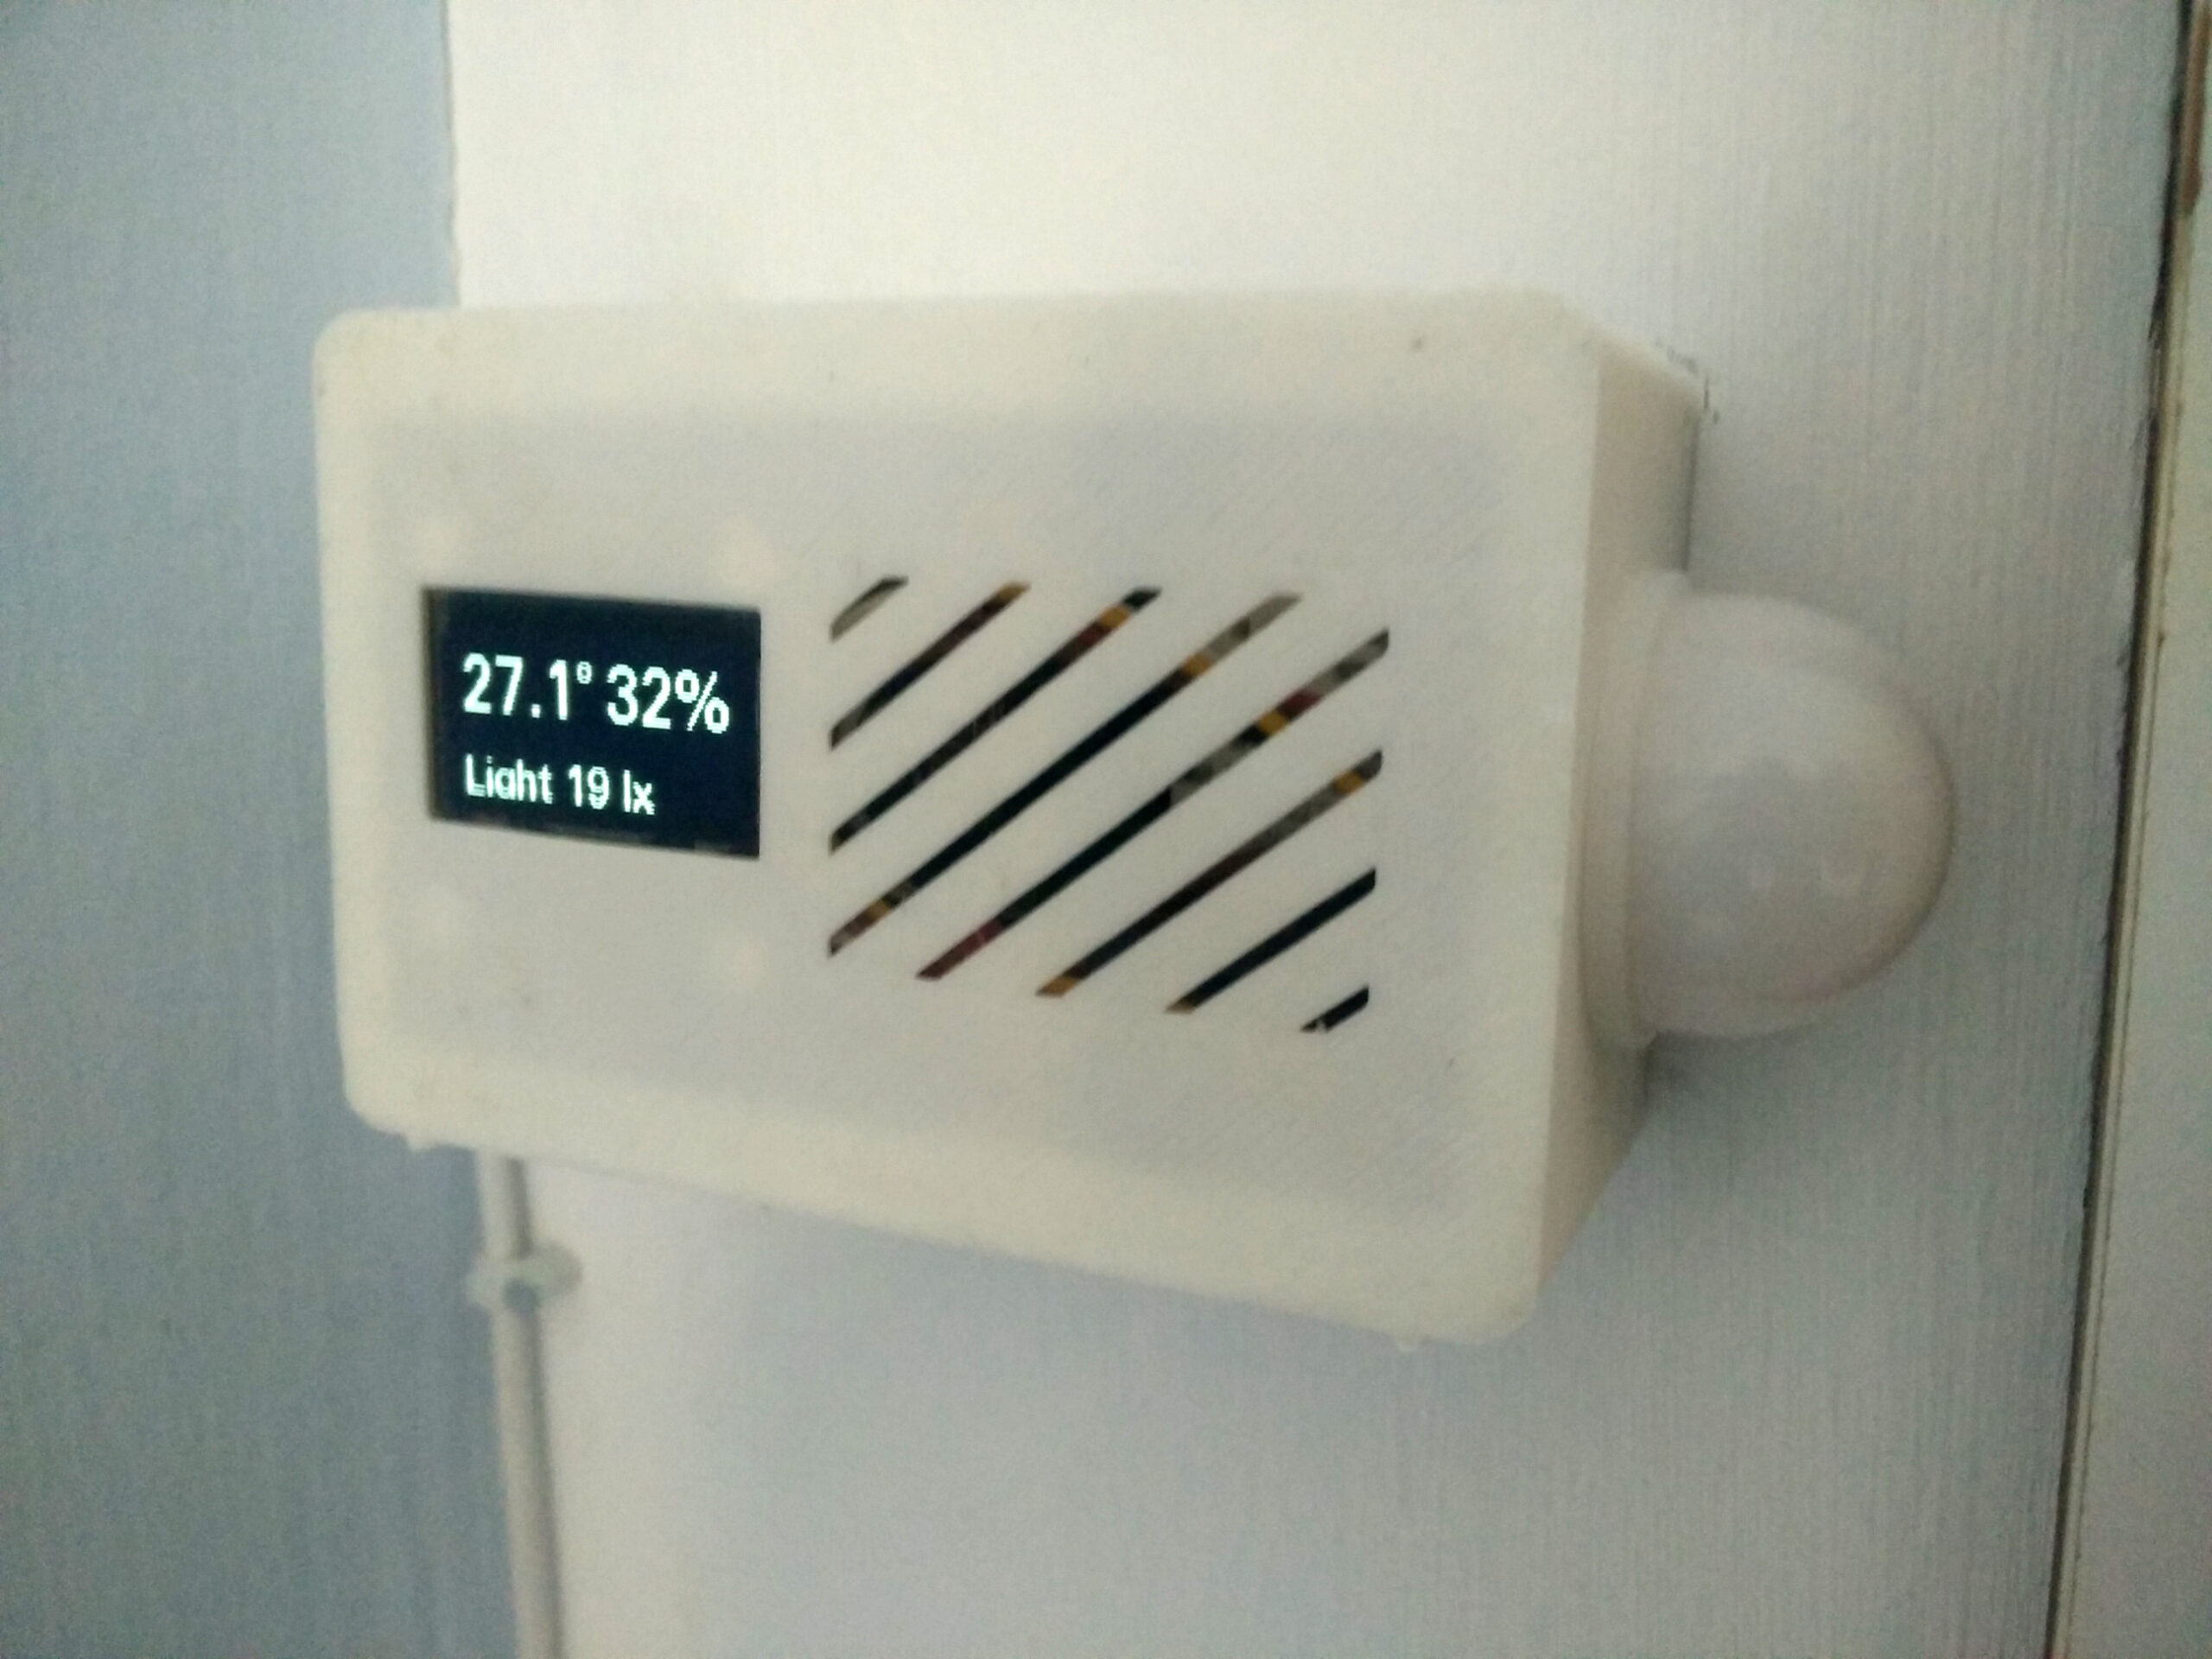
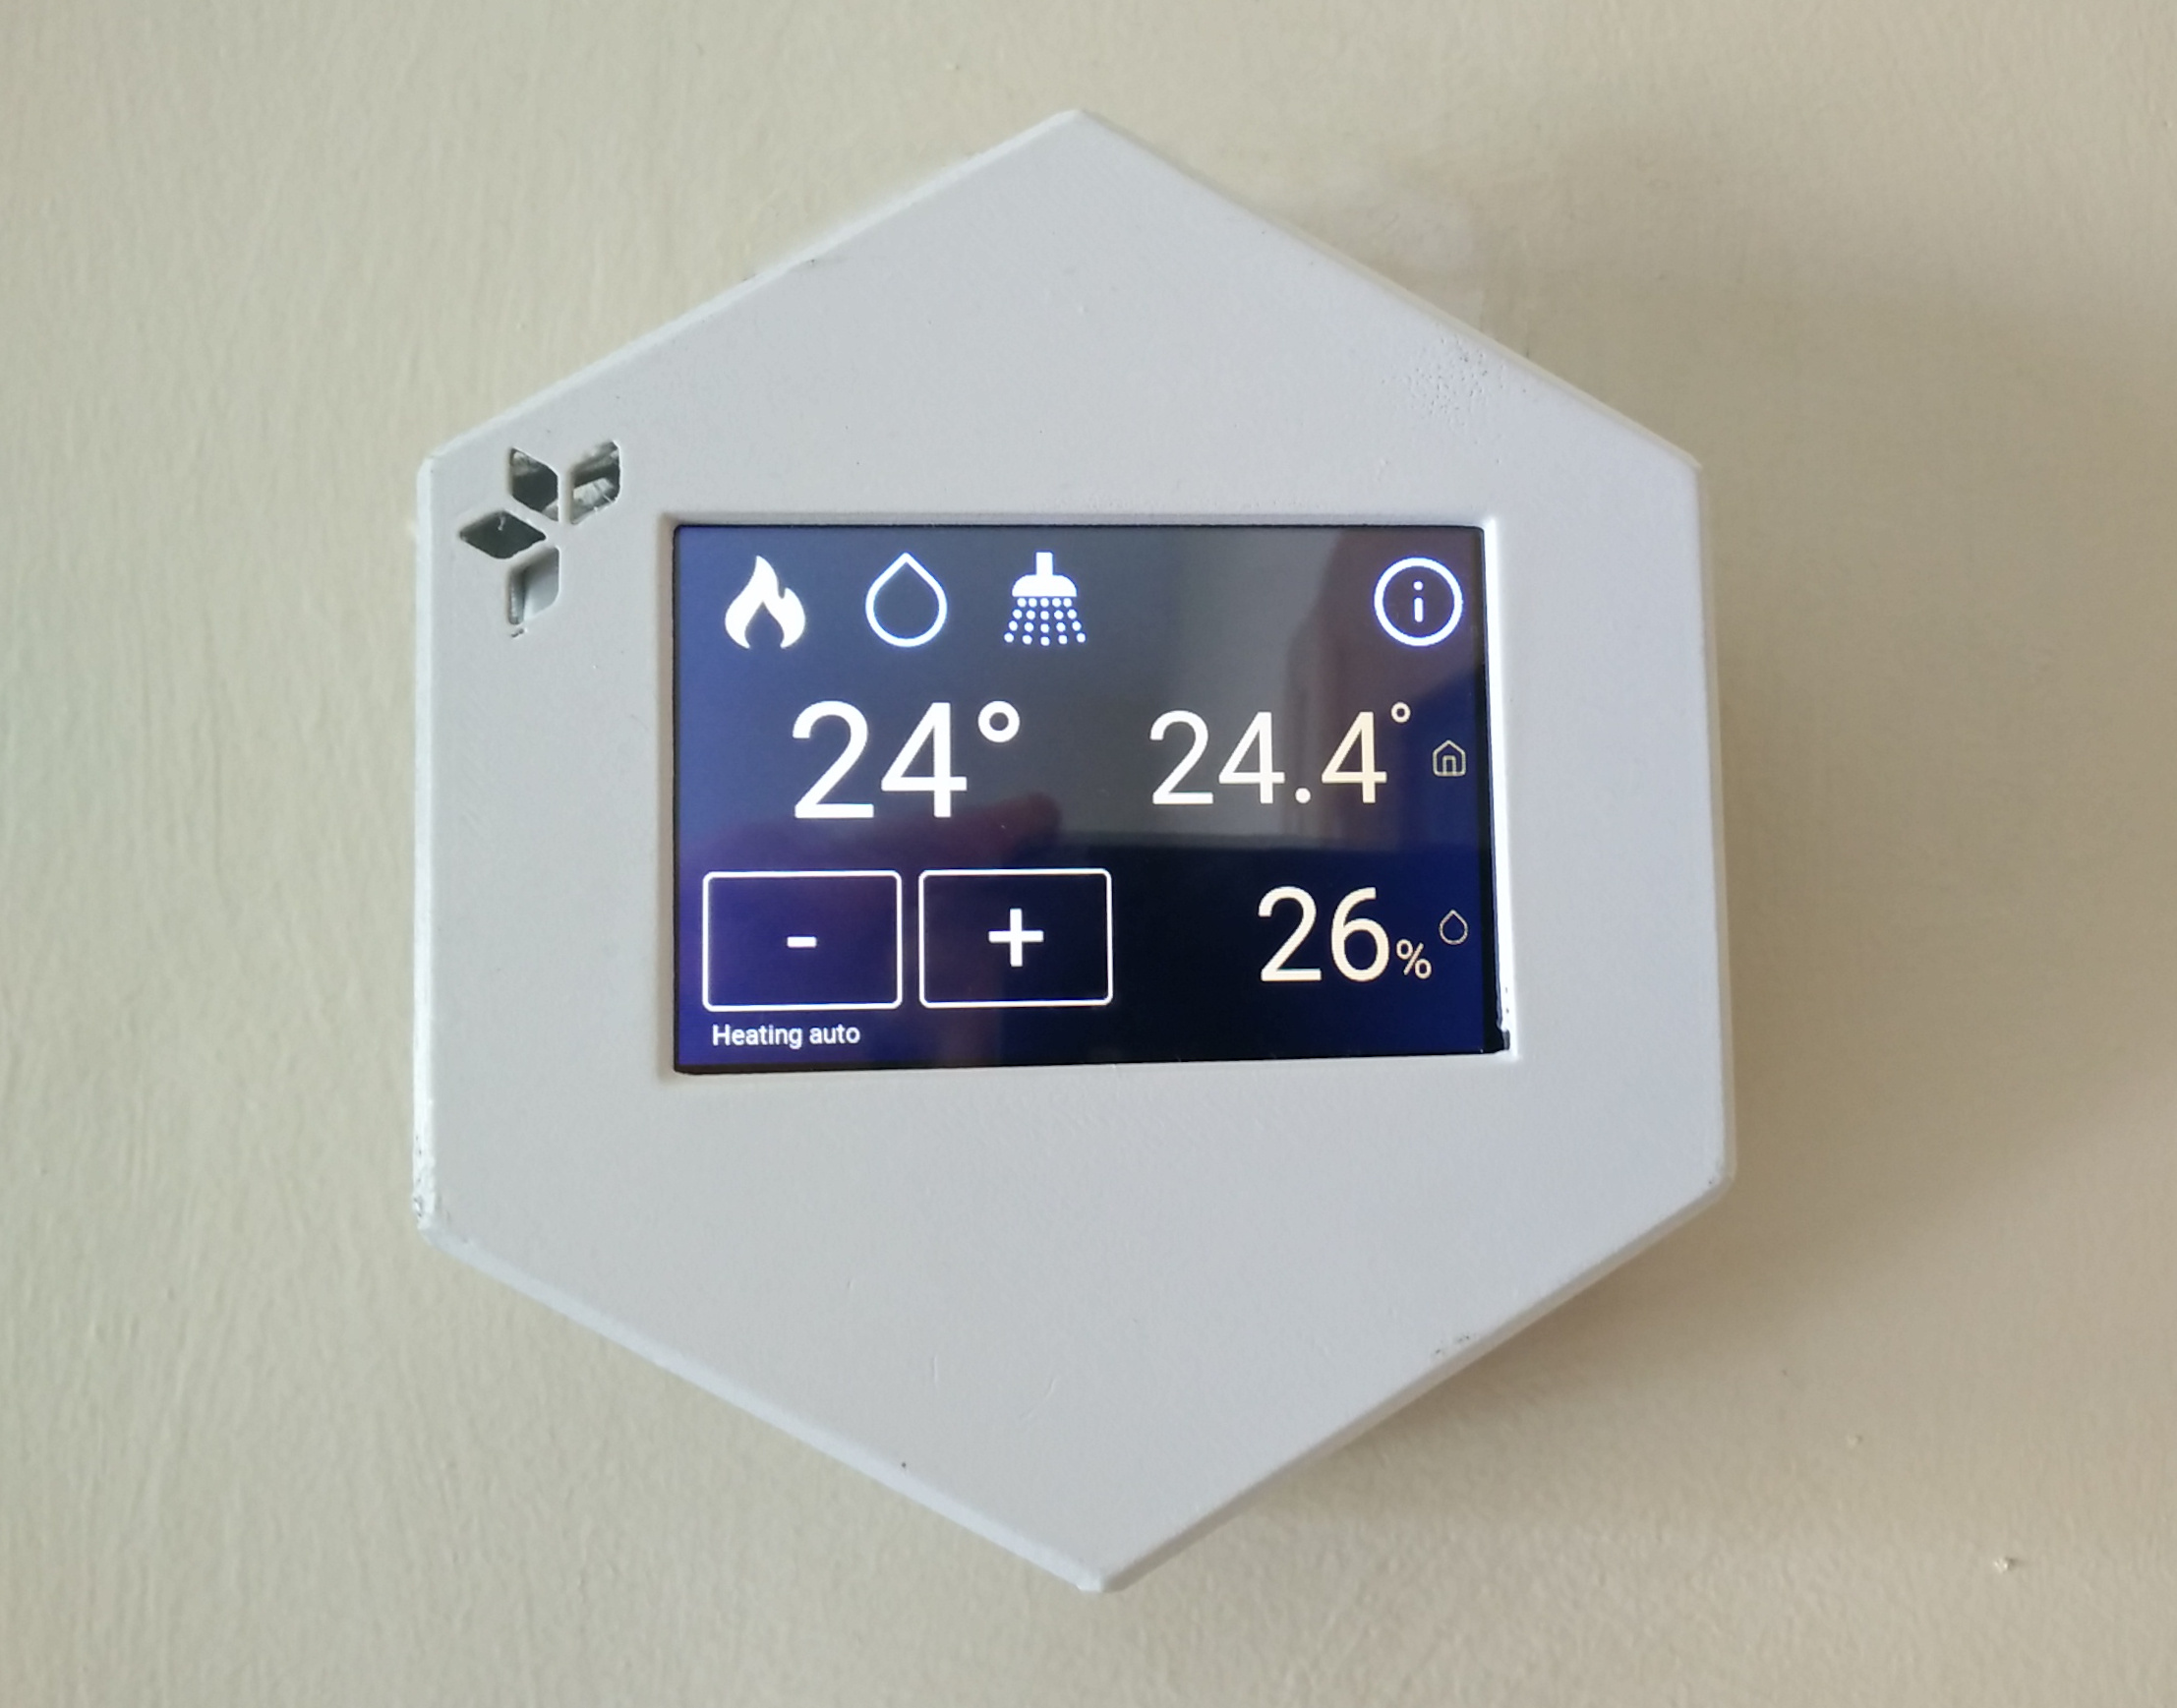
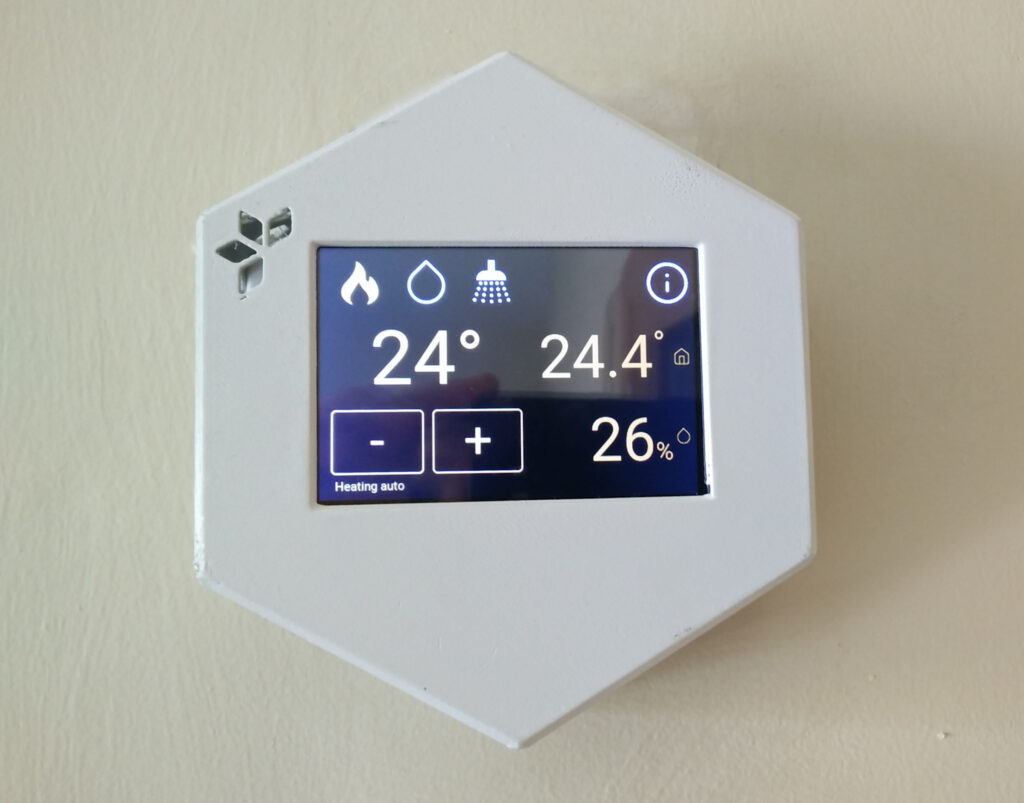
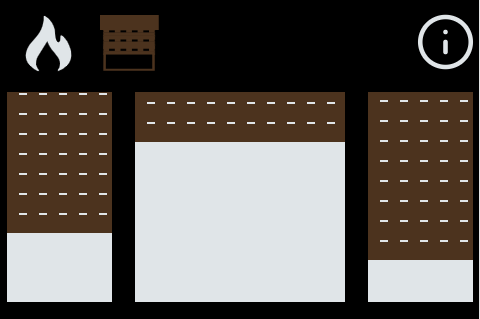
Finally, I was wondering how to arrange the switch for 3 roller shutters at once. I envisioned the thermostat as the perfect place to control the roller shutters: it is placed in the same room, it is tactile, so you can control the positions with one gesture. So I modified the my thermostat‘s software so we could control the 3 roller shutters in their own screen, at once. You can find the modifications in the roller-shutter branch of my fork of hestia-touch-one-ui repository.

Hestia Pi’s roller shuter UI

Watch this video to see how well it works!

Hestia Pi controlling roller shutters

Open Bedroom Thermometer: Integration with the thermostat

My main goal of setting an extra thermometer in the bedroom was to integrate it with my open thermostat, placed in the living room. My house is not big, but when we go to bed, we are not in the living room anymore. We want it to watch for the temperature in our bedroom.

Of course, I wanted to automatize this switch as well. Every night, when we go to sleep, the thermostat switches the tracking of the temperatures from the living room thermometer, to the bedroom thermometer. When we wake up, it switches back to the living room thermometer, the one in the thermostat.

One of the great things about using open hardware and software is that you can customize everything. I could change and adapt both the UI and the logic of the thermostat to incorporate the new temperature readings

UI integration

HestiaPi UI is just Javascript (Vue.js) and HTML, running on Kweb, a very light browser for Raspberry Pi. I redesigned the interface to accommodate the new figures. I also added the buttons to switch manually the thermometer that drives the thermostat behavior, from the thermostat sensor to the bedroom thermometer and back. HestiaPi UI communicates over MQTT, the same way than ANAVI Thermometer, so it was pretty straightforward to copy the same logic.

You can find the code in the anavi-thermometer branch of my fork of hestia-touch-one-ui.

Modified interface of HestiaPi including ANAVI Thermometer readings

Backend integration

HestiaPi logic is built on top on OpenHAB. Despite OpenHAB is a bit heavy for running in a Raspberry Pi Zero, it provides HestiaPi with all the power of smart home capabilities.

Backend integration involves new OpenHAB things, channels, items and rules, so it deserves its own post: ANAVI Thermometer – HestiaPi integration

ANAVI Thermometer things and channels in Hestia Pi’s OpenHAB

I feel grateful for having found these two great open projects and being able to play with them, learn many things and having a feeling of accomplishment after customizing my own setup!

This is the last post on these ANAVI Thermometer series, but not the last from Hestia Pi… More hacking to come!

ANAVI Thermometer – HestiaPi integration

This integration works with HestiaPi Touch ONE v1.2

These changes need the HestiaPi Touch UI to be updated with my anavi-thermometer branch.

Add-ons

ANAVI Thermometer publishes values in JSON. They are easy parsed in OpenHAB with the JSONPath transformation add-on. We will need to install it first

Things and items

ANAVI Thermometer

We create a separate Generic MQTT Thing for setting the channels related to ANAVI Thermometer values

Generic MQTT Thing configuration

Then we create appropriate channels for ANAVI Thermometer’s temperature and humidity. They will probably be pushed to workgroup/<your id>/air/temperature and workgroup/<your id>/air/humidity MQTT paths. We use JSONPath for extracting actual values.

ANAVI Thermometer temperature channel
ANAVI Thermometer humidity channel
ANAVI Thermometer thing with channels

Finally, we need to link channels to their corresponding items. You can create them from the link channel, clicking at the arrows on the right

ANAVI Thermometer temperature item
ANAVI Thermometer humidity item

Thermometer Switch

We create an extra MQTT thing, Thermometer Switch, that will be used for selecting which temperature the thermostat is following; based on this thing, HestiaPi will act on changes of the temperature sensor from HestiaPi or the one from ANAVI Thermometer

Thermometer Switch thing

We need to create a new channel for this new thing. We will be reading its state from hestia/local/stat/thermometerswitch MQTT topic

Thermometer Switch channel

And finally, we create an item for this channel

Thermometer Switch channel with its linked item

Hestia Local Sensor Readings

A side effect of the Process Sensor Changes rule modification below is that the original MQTT channels used by HestiaPi to publish local sensor readings hestia/local/temperature and hestia/local/humidity will now publish ANAVI’s readings when Thermometer Switch has Anavi value. We will need to add two extra MQTT things and items to keep those local sensor readings. Former channels become current values the thermostat is considering for taking the decisions about turning on or off.

We add LocalTemp and LocalHumi MQTT channels pointing to hestia/local/localtemperature and hestia/local/localhumidity

LocalTemp channel
LocalHumi channel

And we link these things to their corresponding items LocalTemp and LocalHumi

LocalTemp item
LocalHumi items

Rules

Initialization rule

We will need to add the initial value for Thermometer Switch, that will default to HestiaPi’s value My. This value is not very descriptive, but will match HestiaPi’s item names and will make things easier in the rules below.

initState("ThermometerSwitch", "My");

Process Sensor Changes rule

Process Sensor Changes is the rule that updates temperature, humidity and pressure proxies. It also decides whether to update temperature based on hysteresis changes.

We add two new triggers so the rule is ran also whether AnaviTemp or AnaviHumi change

AnaviTemp trigger for Process Sensor Changes rule
AnaviHumi trigger for Process Sensor Changes rule

However, we need an extra condition: we set the constraint that the sensor that changed has to match the value of ThermometerSwitch, that is, only update values from HestiaPi’s sensor when My is selected in ThermometerSwitch, and only update values from ANAVI’s sensors when Anavi is selected

event.itemName.indexOf(items["ThermometerSwitch"]) == 0 || event.itemName == "MyPressure"

Finally, we slightly modify the rule to get the value from the relevant sensor, that can have My or Anavi prefix now

var OPENHAB_CONF = Java.type('java.lang.System').getenv('OPENHAB_CONF');
load(OPENHAB_CONF + '/automation/lib/hestia/utils.js');
load(OPENHAB_CONF + '/automation/lib/hestia/defaults.js');

var device;
var logName = "sensor";

logDebug(logName, "Changed "+event.itemName);

if (event.itemName == 'MyPressure') {
  device = 'Pressure'
} else {
  device = event.itemName.replace(items["ThermometerSwitch"], "");
}

// Update the proxy
events.sendCommand("My"+device+"Proxy", newState);

// Verifying the newState can be parsed is already checked in the but only if…
var newReading = parseFloat(newState.toString());

var prev = items["Previous"+device+"Reading"].floatValue();
if(prev == NaN) prev = 0;

var hyst = (device == "Temp") ? DEFAULTS.get("Temp"+items["TempUnit"]+"_DIFF") : DEFAULTS.get(device+"_DIFF");

logDebug(logName, "Processing " + device + " with value " + newState + " and prevState " + prev + " and delta " + delta);

var delta = Math.abs(newReading - prev);
if(delta > hyst) {
  logDebug(logName, "Updating Previous"+device+"Reading with " + newState);
  events.postUpdate("Previous"+device+"Reading", newState);
}
else {
  logDebug(logName, "Ignoring " + device + " sensor reading, change is too small");
}
Modified Process Sensor Changes rule

Process Local Sensor Changes rule

Finally, we add an extra rule to publish HestiaPi’s sensor values to the extra MQTT things LocalTemp and LocalHumi that we created before

They will be triggered when MyTemp or MyHumi change

var OPENHAB_CONF = Java.type('java.lang.System').getenv('OPENHAB_CONF');
load(OPENHAB_CONF + '/automation/lib/hestia/utils.js');
load(OPENHAB_CONF + '/automation/lib/hestia/defaults.js');

var logName = "localsensor";

logDebug(logName, "Changed "+event.itemName);

var device = event.itemName.replace("My", "");

// Update the proxy
events.sendCommand("Local"+device, newState);
Open Bedroom Thermometer

Open Bedroom Thermometer

After setting up the mighty open source and open hardware Hestia PI in the living room, an extra thermometer in the bedroom was the next step. Hestia PI‘s does its job amazingly well during the day. But when the night comes, we don’t care about the temperature in the living room, but in the bedroom. We have only one central heating, the bedroom temperature is the one that should drive during the night.

In the spirit of my requirements, I found an amazing project that filled my expectations: ANAVI Thermometer.

Leon Anavi is a open hardware enthusiast from Bulgaria that creates awesome open hardware and open software projects. His products are open hardware certified. He has infrared transmitters, gas detectors, fume extractors… And, of course, a thermometer.

ANAVI Thermometer
ANAVI Thermometer with its original kit. Source: Anavi Tecnology

I purchased one from Crowdsupply. But I didn’t just placed it. I wanted to make some customizations to fulfill my needs and make it look more like an end user product! So I made the following changes:

The final result in its placement looks great!

Debugging in Kweb

I have been recently hacking on HestiaPi‘s interface, so I could add the measures from ANAVI Thermometer to HestiaPi‘s interface. When I first tried to deploy the last version of the interface, it didn’t work

It looked like a Javascript error, so I tried to see what was going on in Kweb, the browser that runs hestia-touch-one-ui, HestiaPi‘s interface. Kweb is a minimal kiosk browser. It is perfect for RaspberryPi, where resources are limited (HestiaPi runs in a RaspberriPi Zero)

I could open a new console exporting the X window system ssh -Y hestiapi, and fire up Kweb. However, Kweb interface does not comes with a Javascript console like the ones web developers are used to

But I could use a trick to find out what it was going on. I added a callback to window.onerror event so I could show the errors through alert

<script>window.onerror = function(msg, url, lineNo, columnNo, error) { alert(msg); alert(url); alert(lineNo); alert(columnNo); alert(error); }</script>

It was quite tricky but it did the job. I could find out that the building process was not traspiling ES6 let, happily fix the issue and deploy my bright new with bedroom measures from ANAVI Thermometer in HestiaPi!

My thermostat, with root access

HestiaPi looks awesome. An open software and open hardware project, Raspberry Pi based, customizable LCD touch screen, it is all you can ask as a basis for your home IoT infrastructure.

It took some time to arrive though. I ordered it via Crowd Supply, a great site with wonderful open hardware gadgets and solid ethic principles. I made my order in mid October, but due to some problems I was not going to get it until March. Luckily, I didn’t have any problem cancelling my order and I could ask it directly from Greece to Spain. Why crossing the Atlantic ocean there and back again when it had just to cross the Mediterranean sea?

Adapting it to my heater was a bit challenging. My heater offers 2 wires, while HestiaPi expects only one. It just sends the power line back to the heater.

There is a hack to remove the power transform and use a 5V USB charger to decouple the line from the heater and the power line from the raspberry.

Another option I was considering was to cutting the track that connects the power line with the heater. But I didn’t want to damage my brand new thermostat!

Decouple power line from heater line in HestiaPi

Finally, I ended up disassembling the heater. I found out it has just a fuse before the line sent to the thermostat.

Connections in front of the heater board
Connections in back of the heater board

In fact, in the installation manual there is a option to connect a thermostat with an anticipatory resistor that matched my idea. I finally went for this last option, so I didn’t have to break the HestiaPi and soldering the power line.

I am very happy with the result. It works great!

HestiaPi installed and working

But I am more excited with what will come next. I am overwhelmed by the possibilities. Besides the capabilities of OpenHAB, the touch screen is built in HTML and Javascript, so I will totally customize it to meet my needs!

I am already integrating another open software hardware, the ANAVI Thermometer.

And integrating the roller shutters into the thermostat will come next!